

Cute, huh?

All you need is some basic crochet knowledge, a skein of your favorite yarn & a crochet hook (I used a size J).
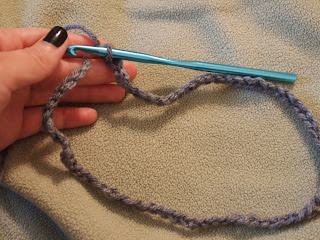
You will begin by making a slip knot & chaining up to the circumference of your head. This will vary from yarn to yarn and depend on what size hook you used. Mine ended up being about 45 chains. And it looked something like this...
 Once you have chained up to your desired length you will do a simple slip stitch to unite both ends together. Once you have done that, you will need to chain three so you can start the second round of stitches.
 The next step is easy, you simply need to double crochet in each stitch until you have gone all the way around. The process should look like this...


So essentially what we will be doing is double stitching through the front and back of each chain. (The areas where my little fingers are poking out of).

The pattern will basically be double crochet forward, double crochet backward, and repeat. And it should look something like this...
First start off as if you were doing a regular double crochet, go into the hole from the front...


Then go right behind it & come out again through the front...


Once you have done than, pull through the yarn to continue the double crochet.

You will then be left with the three loops of a regular double crochet stitch. Simply crochet it as you normally would!

The next step it to do the same thing but now going in through the "back". I have made a quick video of the procedure to make it a little easier. (I apologize for the weird and funny sounds in the background!)
Once you have gone all the way around it should look like this...


(Simply slip stitch and chain 3 to start the next one!)You will continue with this pattern three more times around for a total of 4 complete rows.
After you complete the 4 rows, you will again bring it together with a slip stitch & chain 3.
Next, you will alternate one double crochet in a stitch and two double crochets in the next. (Do this for 3 rows).

Your hat should begin to look like this skirt-y lookin' thang.


You will then be left with a small circle which you will need to tie off like this...


Once you have brought together all sides of the hat, you will need to snip the yarn & tie off.

 Then, simply weave the remaining tail in and out on the inside of your hat to hide.

Confessions:


Once you have gone all the way around, you will once again bring it together via slip stitch & chain up three.

***
The next step is where it gets a little dice-y, and I will be upfront and honest...I don't know the technical names for the next few stitches, I just know that it gives your work a more textured feel.So essentially what we will be doing is double stitching through the front and back of each chain. (The areas where my little fingers are poking out of).

The pattern will basically be double crochet forward, double crochet backward, and repeat. And it should look something like this...
First start off as if you were doing a regular double crochet, go into the hole from the front...


Once you have done than, pull through the yarn to continue the double crochet.


(Simply slip stitch and chain 3 to start the next one!)
After you complete the 4 rows, you will again bring it together with a slip stitch & chain 3.
Next, you will alternate one double crochet in a stitch and two double crochets in the next. (Do this for 3 rows).


In order to begin to bring together your work, we will need to decrease our stitches. We will do this through the following pattern:
- 1 row simple double crochet through each stitch
- 4 rows double crochet EVERY OTHER stitch
- 2 rows simple double crochet through each stitch
- double crochet EVERY OTHER stitch until work comes together in a small circle
The process of the pattern should look like this...


You will then be left with a small circle which you will need to tie off like this...

Stitch opposite sides together through a slip stitch like so...


Presto! Your baby should look like this.

Confessions:
- I realize bits and pieces of this may not have been "tutorial-worthy" and may have even caused some confusion -- but hey! it's my first time and I hope I can only make it a smoother process for the future! :)
- I created this post for those who have basic crochet knowledge so I did not go into thorough how-to's about slip knots, slip stitches, double crochets, tying off, etc. So I apologize for those who got confused because of that!
- I hope that even if you did get lost you at least gained some creative ideas on how to start a hat from the bottom up as opposed to the traditional crochet hats out there!
Happy thoughts and comments are always appreciated! :)
~Blessings, A.